If you use a computer for business purposes, it becomes more than important for you to encrypt your hard disk. And if you are using Ubuntu, encrypting the hard disk isn’t that difficult.
Steps to Encrypt Your Hard Disk in Ubuntu
Ubuntu provides a built-in tool that lets you encrypt your hard disk data. Below, we have shared some simple steps to encrypt your hard disk in Ubuntu. Let’s get started.
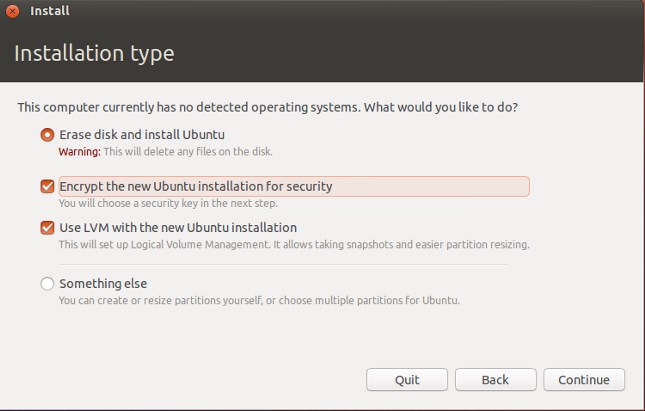
First, load the Ubuntu installation disk and start the installation process. On the Installation Type, select “Erase disk and install Ubuntu” and check the box for the option “Encrypt the new Ubuntu installation for security“. After all the selections, click the Install Now button to begin the installation process.
If you are running a dual OS on your device, then note that you would have to select the “Install alongside..” option and then select those encryption options. After that, select the installation process by clicking on the Install Now button.
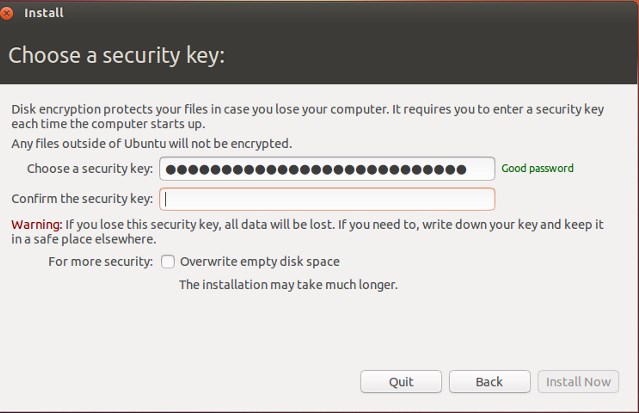
Now, after the 2nd or the 3rd step, you will see that Ubuntu will load the configuration page, asking you to set the encryption key for the installation.
You would then have to set up your custom security key. Check the box saying “Overwrite empty disk space” if you wish to perform that action. Select the Install Now button and follow up with the typical Ubuntu installation.
After the overall Ubuntu installation process, you could then back up all your data from your previous Ubuntu and then start to use it as normal. The hard disk will be encrypted automatically, and the key for it is the one you have created in the 4th step. So, these are some simple steps to encrypt your hard disk in Ubuntu. If you need more help encrypting your Hard disk in Ubuntu, let us know in the comments below. Also, if the article helped you, share it with your friends.

